Showing posts with label Syspro 7. Show all posts

Friday, 29 August 2014

Best Practices for SQL Server for Syspro

These are recommended best practices for configuring SQL Server for use with Syspro.

Basic configuration

  • The collation order must be Latin1_General_Bin for Syspro.
  • Use Mixed Mode Authentication.
  • Store your database on a DIFFERENT disk to your database's log file.
  • Store your backups on a third disk.
  • Use RAID 5 (recommended by Syspro) or RAID 1+0 for data protection.
  • Give your database server plenty of memory. As a point of reference, 10 Gb is very nice for a 20 user site.
  • Create at least one user for Syspro to access the database; don't use the system administrator user (sa) for Syspro!

Backup basics

  • Copy your backups off your server, ideally daily
  • Take a copy of your backup OFF SITE regularly
  • Keep backups at several levels: yearly, monthly, weekly and daily,

Really bad backup practices to avoid at all costs


  • Backing up to the same disk as the database - if the disk dies, you’ll lose all your data for ever!
  • Not backing up at all!

SQL Log file settings

If using the FULL recovery model, the SQL log file should be set so that if it fills up, it will leave a few Gb unused on the file-system so that you don’t crash Windows.

If using the SIMPLE recovery model, the SQL Log file should have its maximum size set to a safe limit so that if it fills up to that limit, it WON’T fill up the hard disk. As a rough guide, that limit should be about 2 to 4 times the normal database size; anything beyond that would need special circumstances.

Other recommended log file settings:

  • AUTOGROWTH - Yes
  • AUTOSHRINK - NO; definitely not. Setting it to Yes is bad practice; the log file should ideally be a static size, large enough for each day’s transactions.
  • Recovery Model - Full Recovery Model is recommended; SIMPLE Recovery Model is OK.

Anti-virus software on your SQL Server?

It sounds like a good thing, but it's the wrong tool for the job. You should be using a host intrusion detection system (H-IDS) such as Tripwire. See this post for details.
However, if you do have anti-virus software on your SQL and/or Syspro server, you should exempt these files from being scanned: your database files including log and backup files (*.mdf, *.ldf, *.bak), and all your Syspro settings, work and data files (C:\Syspro\Work\*, C:\Syspro\Data\*, C:\Syspro\Base\Settings\*).

Tuesday, 20 May 2014

How to run multiple versions of Syspro

If you are a Syspro developer, you may want to run multiple versions of Syspro on the same machine. This article describes how to install and switch between version 6.1 and 7.0 of Syspro.

Setup

You probably already have Syspro 6.1 (server) installed, plus Syspro 6.1's versions of Syspro WCF and Syspro Web Services, so we'll take that as the starting point.

Install Syspro 7.0 (server), but pay attention to the points below.

Installing Syspro 7.0 Web Services

When installing Syspro Web Services version 7, it will remove and replace version 6.1’s web services; that is OK; you will not need to re-install Syspro 6.1 web services to access Syspro 6.1 web services. You will be able to access both versions of web services with Syspro 7's web services... so long as you follow the steps below under "Switching between versions".

Installing Syspro 7.0 WCF

Installing Syspro 7 WCF will wipe out your Syspro 6 WCF installation, so the recommend procedure is:
  1. Backup your Syspro 6 WCF config file.
  2. Install Syspro 7 WCF.
  3. Re-install Syspro 6 WCF, but to a DIFFERENT directory.
  4. Re-configure Syspro 6 WCF using the config file you saved in step 1.
  5. Configure Syspro 7 WCF to use DIFFERENT ports to Syspro 6.1 WCF.

Switching between versions

From an elevated command prompt, unregister the Syspro 6.1 version of Encore.dll and register the Syspro 7 version, e.g.

cd /syspro61/base
regsvr32 /u encore.dll
cd /syspro7/base
regsvr32 encore.dll

Then you should be able to use Syspro 7’s web services – you will need to use the correct company code and the instance number for your Syspro 7 installation, of course.

You will not be able to access Syspro 6 while Syspro 7’s Encore.dll is registered; you must use the procedure in reverse to unregister Syspro 7's Encore.dll and register Syspro 6.1's Encore.dll.

Wednesday, 9 April 2014

How to install a Syspro 7 Client

These are the detailed steps needed to install the Syspro 7 Client on a Windows computer, preferably a 64-bit version of Windows 7 or 8, although a 32-bit version or Windows XP will probably suffice.

The installation is actually very easy - you would normally simply accept all the default values.

1. Installation


From the Syspro 7 installation CD, run Autorun.exe, then click Client Installation, as highlighted in the screen shot below:


Click Syspro 7 Client.


Click Install.


Click Install to install the SYSPRO Runtime.


Tuesday, 18 March 2014

How to convert a Syspro 6.1 database to Syspro 7

This is a basic procedure to use when you have a parallel installations of Syspro 6.1 and Syspro 7 and are upgrading from Syspro 6.1 to Syspro 7. There is a full procedure published by Syspro; you should follow that full procedure, which includes backing up, balancing, etc. This procedure is the quick-and-nasty procedure for developers to use in a non-production environment.

  1. Log out of Syspro 6.1.
  2. Create a backup of your Syspro 6.1 database.
  3. Move all your Syspro 6.1 settings files from 6.1 to 7:
    Move C:\Syspro61\WORK\?TBL*, ?ARSFMT*, ?SORFMT* and ?TBL* to C:\Syspro7\WORK
    where ? is the company prefix you are copying.
  4. Log into Syspro 7 into the new company.
  5. You should see the conversion wizard start automatically.
  6. Proceed through the wizard.

Friday, 8 November 2013

Syspro 7 Prerequisites

The prerequisites for Syspro 7 are listed in various places throughout the document, SYSPRO 7 Installation Guide.pdf; here are those prerequisites, collated in one easy place.

In short, Syspro 7 supports, and would be best deployed on the latest Windows servers and operating systems:
  • Windows Server 2012
  • SQL Server 2012
  • Windows 7 and Windows 8 clients, x64.

Server Prerequisites


The SYSPRO 7 Application Server prerequisites include:
  • Microsoft Windows Server 2003 (or later) or 
  • Microsoft Windows XP SP3 (or later) 
  • Microsoft .NET Framework 4.0
(Some features, e.g. Workflow Services, are limited on XP and 2003 Server as those versions of Windows do not support the .Net Framework 4.5 - see below.)

The SYSPRO Communication Service prerequisites include:
  • Microsoft ® .NET Framework 4.0
  • SYSPRO 7 (server installation)

The SYSPRO Workflow Services application server installation prerequisites include:
  • Microsoft ® .NET Framework 4.5 
  • A SQL Server installation of SQL 2005/SQL Express 2005, or higher, for each SYSPRO company 
  • SYSPRO 7 (server installation)


The SYSPRO Reporting Services prerequisites include:
  • Microsoft ® .NET Framework 4.0 
  • SYSPRO 7 (server installation) 
  • Crystal Server Runtime 
  • Java Runtime


The SYSPRO WCF Services prerequisites include:
  • Microsoft .NET Framework 4.0
  • SYSPRO 7 (server installation)


The SYSPRO Web Services prerequisites include:
  • Microsoft ® .NET Framework 4.0 
  • Internet Explorer 6 (or higher) 
  • Windows XP SP3 (or later) 
  • Internet Information Services (IIS) 6 
  • IIS6 Compatibility 
Note:
If the .NET Framework is installed before IIS you will need to run aspnet_regiis.exe.

Client Prerequisites

The SYSPRO 7 Client prerequisites include:
  • Microsoft ® Windows XP SP3 (or later) 
  • Microsoft ® .NET Framework 4.0 

Note:
Windows XP SP3 will require a Hot Fix in the form of sxs.dll which is available to download at http://support.microsoft.com/kb/943232

The SYSPRO Communication Service Client prerequisites include:
  • SYSPRO 7 (server installation) on the server 
  • SYSPRO Communication Service on the server 
  • SYSPRO 7 (client installation) on the client machine


The SYSPRO Reporting Services Client prerequisites include:
  • Microsoft ® .NET Framework 4.0 
  • Java Runtime 
  • Crystal Runtime


The Crystal Designer prerequisites include:
  • Microsoft ® .NET Framework 4.0 
  • Java Runtime 
  • Crystal Runtime


The Crystal Dashboard Design prerequisites include:
  • One of Microsoft Excel 2010 (32-bit), Excel 2007, Excel 2003 or Excel XP


The SYSPRO Factory Scheduling prerequisites include:
  • Microsoft ® .NET Framework 4.0 


The SYSPRO Graphical Planning Board prerequisites include:
  • SYSPRO Factory Scheduling Foundation


The SYSPRO Finite Scheduler prerequisites include:
  • SYSPRO Factory Scheduling Foundation.


The SYSPRO Graphical Planning Board prerequisites include:
  • SYSPRO Factory Scheduling Foundation

Tuesday, 15 October 2013

How to install Syspro 7 - Server

These are the detailed steps needed to install Syspro 7 Server on a Windows computer, preferably Windows Server, although Syspro 7 will suffice.

The installation is actually very easy - you would normally simply accept all the default values, and you normally wouldn't need the rest of this document, except when you hit the occasional problem.

1. Installation


From the Syspro 7 installation CD, run Autorun.exe, then click Server Installation, as highlighted in the screen shot below:


Click Syspro 7:


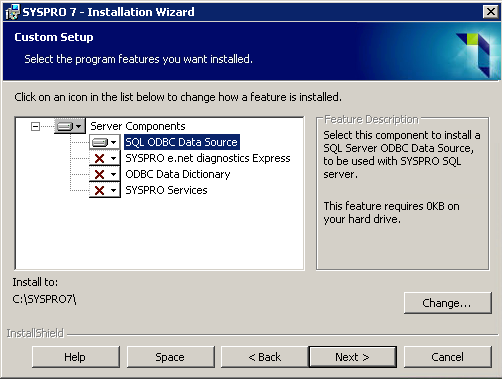
Select all the components you want installed:


If you are upgrading from Syspro 6.1, you may get asked to close some programs.

Before you do, BACKUP your Syspro 6 WCF Communications Service configuration file, as Syspro will remove the Syspro 6 Communications Service. This is because the Syspro 7 Communications Service is backwards compatible with the Syspro 6 one, but your config file gets deleted.
My config file was in C:\SYSPRO\SYSPRO Communication Service\SYSPROCOMMSService.exe.config.

Then click Yes:


Click Yes to install the Syspro 7 Runtime:


If you are doing an upgrade from an earlier version of Syspro, you may get asked the following; answer Yes:


Click Next:


Accept the licence agreement and click Next:


Decide whether you want to do an upgrade or a new installation, and click Next:


Select the components you need to install. You would not normally select any of these components as they have been superceded by Syspro WCF, Syspro Communications Service, etc.

Note for Syspro 7 RC010: you may wish to install the SQL ODBC Data Source so that you can connect to your database via ODBC, as you can't use the direct SQL Server conneciton as there is a bug in Syspro 7 whereby, when the direct SQL Server's connection string's UID is left blank.


Alternatively, you might select to install the SQL ODBC Data Source:


If installing the ODBC connection, you will get asked for connection information:


Click Install:


After a while you will get this screen; click Finish:


Next you get prompted to install the Syspro Communication Service (recommended):


Select the directory where you want to install the Syspro 7 Communications Service. If you are installing multiple versions of Syspro in the same machine, you may wish to use a directory that won't overwrite an existing installation. Then click Next:


Click Next:


Click Close:


When done, click Exit:


2. Setup

After Syspro has been installed, you need to set it up. To do this, run Syspro 7 from your Start menu on your server. You should see a welcome screen like this; click Next:


Select the Nationality and Date Format:


Set the password for the Administrato. It is advisable to set a password!


Select the type of database you want to use. Normally, you'd want to just select All companies are SQL Server based:


Alternatively, you might selected a mix of SQL Server and ISAM databases:


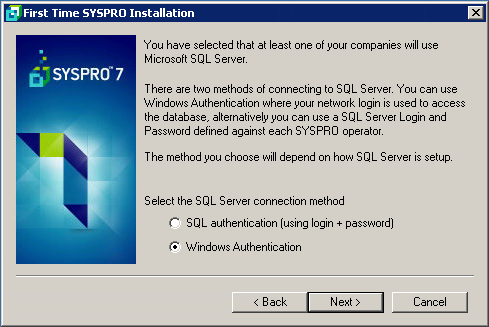
Select what sort of authentication you want to use.


However, as of Syspro 7 RC009, there are bugs in the use of SQL authentication whereby the connection string leaves the UID blank, and using the ODBC Data Source doesn't seem to work either, so you should select Windows Authentication, or use RC010 which has fixed this problem.

Note that to get Windows Authenticaiton to work, you will have to:

  1. Set your SQL Server to use Mixed-Mode: in SQL Server Management Studio, right-click on your server and go to Properties; go to the Security tab; set Server authentication to SQL Server and Windows Authentication mode.
  2. Give your Windows login sysadmin rights: in SQL Server Management Studio, expand your Server, then under Security, right-click on Logins and select New Login. Enter your Login name. Go to Server Roles and tick sysadmin.


Enter a SQL Server Login name and password. You should create a login name such as "syspro"; it's bad practice to use the "sa" login. Tick "All SYSPRO operators will use this SQL Server login".


Enter your connection string for SQL Server.


Note that there is temporarily, in the release candidate, a problem with using connection strings - there is an error in COMLGN were  Callbo does not work (and SRS), so you should use a System Data Source Name (DSN).

If you are connecting via a DSN, then you will need to manually create an ODBC data source first, unless you selected to install the SQL ODBC Data Source as part of the installation earlier.

Enter the name of the Syspro system-wide database; you'd normally leave this unchanged as Sysprodb:


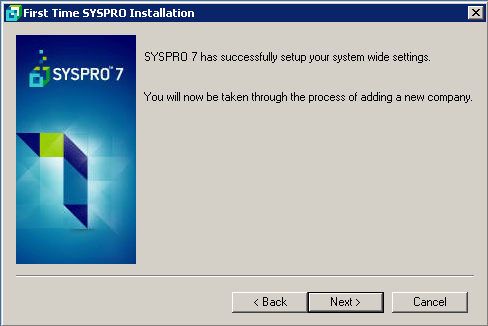
The ensuing steps are fairly straight forward and so are not listed in detail here.
__________________________________________________________________________

If you hit an error such as:

Message: Incorrect open mode for fle type
Access: Attempting to open a file
File name: C:\SYSPRO7\WORK\IMPACT.INI
Status: 37
Program: IMPNEW - Admin First Time SYSPRO Installation


then you may need to give additional permission on the Syspro WORK directory, as shown in the screen shot below:


__________________________________________________________________________