Thursday, 17 October 2013

Developing .Net User Controls for Syspro - Intro

Syspro gives you the ability to house a .Net User Control inside the Syspro application, in a custom pane. (A custom pane can be housed in nearly any Window in the Syspro application, or in the Syspro main menu.) The custom-written control can then interact with your Syspro user interface, the Syspro database, and the Syspro Business Objects - so it's a very nice way to write custom solutions.

However, there are a few traps for the uninitiated:


  1. You need to start with a WinForm user control because Syspro can’t run WPF user controls directly; not hard to resolve; you just add a WPF user control inside your WinForm user control.
  2. You need to add Assembly Resolver code so that your DLL’s are loaded from ManagedAssemblies rather than BASE. See this post on the Syspro Forum for details.
  3. You need to override the loading of configuration files as the .Net default of BASE\IMPACT.exe.config is obviously inappropriate.
    This code is good: http://stackoverflow.com/questions/6150644/change-default-app-config-at-runtime
  4. There are some traps with calling Business Objects from .Net via Syspro's VBScript interface.
    In short, you need to:

    A. Avoid going over the 70-character limit, so passing XML files via temporary files is one solution.

    B. Avoid using spaces, new lines, or other characters, that are of significance to VBScript, in the strings you pass from .Net to Syspro's VBScript. The way to solve this is to encode all those characters as control characters before passing them to VBScript, then decode them inside the VBScript.

    C. You may need to pass more than two parameters to Syspro from .Net, but you only have two variables you can use. One way to solve this is to combine several parameters into one string, separating them with control characters.


Wednesday, 16 October 2013

Recommended Naming Convention for custom tables and fields

If you add custom tables or fields directly to the Syspro database, it is highly recommended that you use a naming scheme like these examples:
  • CUSTOM_YourTableName
  • USR_YourTableName
  • CUSTOM_YourFieldName

The guidelines for the naming convention are:
  1. The first word is in ALL-CAPS and should be the same word used for all customisations; CUSTOM or USR are the recommended words to use. CUSTOM is recommended over CUS because CUS is abbreviated and ambiguous with "Customer".
  2. The actual meaningful table or fieldname should be in CamelCase without underscores.
  3. The two words, CUSTOM and YourTableName, should be separated by an underscore.

The reason why the first word, CUSTOM, should be in ALL-CAPS is so that:
  1. It makes all custom-added tables (and/or fields) stand out visibly from the standard Syspro ones.
  2. It groups all the custom-added tables and fields together.


Guidelines for adding custom tables and fields to Syspro

It is very easy to add custom information to Syspro.

There are a few ways you can go about it.

1. Use a User-Definable field

There are some spare fields in Syspro; they usually go by the name of "user-definable field", but there are not many of them. Here are some of them:

  • SorMaster.User1
  • SorDetail.MUserDef

The advantage of using these fields is that they can usually be passed or retrieved as standard parameters in the relevant Syspro Business Objects.


2. Use standard fields

There are several fields to which you can add a LOT of information in Syspro:

  • Notes - Many tables have free-form notes in which you can write a large amount of text.
  • Files - You can attach files to may Syspro tables - multimedia files, pictures, diagrams, etc.


3. Create a Custom Field

You can add custom fields, via the Syspro GUI, to just about any Syspro table and screen. The advantage of doing things this ways is that these custom fields are editable by the Syspro user, without any extra code needing to be written.
In Syspro 6.1 and earlier, these custom fields are stored in the AdmFormData table.
In Syspro 7, these custom fields are added to the actual table (e.g. InvMaster).

These fields can be written and retrieved using these business objects:
  • COMSFM - create/update custom fields
  • COMQFM - query custom fields

Using the AdmFormData does come with a bit of friction – having to write the extra calls to save or retrieve the custom fields using the Business Object or messy joins in SQL, plus having to obtain the correct key fields.
However, this would normally be the recommended way of extending the data stored in Syspro.


4. Update the database schema

You CAN update Syspro's database schema, provided you adhere to the following rules: 
  1. You can ADD tables and indexes to Syspro. This is the safest way to go.
  2. You can ADD fields to existing tables, but adding separate tables is recommended over this option as it keeps everything entirely separate.
  3. You must not delete any standard schema objects: tables, fields, indexes, relations, etc.

If you update the database schema, it is highly recommended that you follow the Recommended Naming Convention for custom tables and fields.


Tuesday, 15 October 2013

How to install Syspro 7 - Server

These are the detailed steps needed to install Syspro 7 Server on a Windows computer, preferably Windows Server, although Syspro 7 will suffice.

The installation is actually very easy - you would normally simply accept all the default values, and you normally wouldn't need the rest of this document, except when you hit the occasional problem.

1. Installation


From the Syspro 7 installation CD, run Autorun.exe, then click Server Installation, as highlighted in the screen shot below:


Click Syspro 7:


Select all the components you want installed:


If you are upgrading from Syspro 6.1, you may get asked to close some programs.

Before you do, BACKUP your Syspro 6 WCF Communications Service configuration file, as Syspro will remove the Syspro 6 Communications Service. This is because the Syspro 7 Communications Service is backwards compatible with the Syspro 6 one, but your config file gets deleted.
My config file was in C:\SYSPRO\SYSPRO Communication Service\SYSPROCOMMSService.exe.config.

Then click Yes:


Click Yes to install the Syspro 7 Runtime:


If you are doing an upgrade from an earlier version of Syspro, you may get asked the following; answer Yes:


Click Next:


Accept the licence agreement and click Next:


Decide whether you want to do an upgrade or a new installation, and click Next:


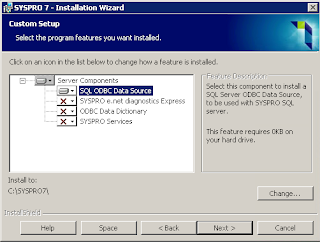
Select the components you need to install. You would not normally select any of these components as they have been superceded by Syspro WCF, Syspro Communications Service, etc.

Note for Syspro 7 RC010: you may wish to install the SQL ODBC Data Source so that you can connect to your database via ODBC, as you can't use the direct SQL Server conneciton as there is a bug in Syspro 7 whereby, when the direct SQL Server's connection string's UID is left blank.


Alternatively, you might select to install the SQL ODBC Data Source:


If installing the ODBC connection, you will get asked for connection information:


Click Install:


After a while you will get this screen; click Finish:


Next you get prompted to install the Syspro Communication Service (recommended):


Select the directory where you want to install the Syspro 7 Communications Service. If you are installing multiple versions of Syspro in the same machine, you may wish to use a directory that won't overwrite an existing installation. Then click Next:


Click Next:


Click Close:


When done, click Exit:


2. Setup

After Syspro has been installed, you need to set it up. To do this, run Syspro 7 from your Start menu on your server. You should see a welcome screen like this; click Next:


Select the Nationality and Date Format:


Set the password for the Administrato. It is advisable to set a password!


Select the type of database you want to use. Normally, you'd want to just select All companies are SQL Server based:


Alternatively, you might selected a mix of SQL Server and ISAM databases:


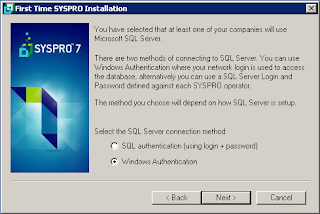
Select what sort of authentication you want to use.


However, as of Syspro 7 RC009, there are bugs in the use of SQL authentication whereby the connection string leaves the UID blank, and using the ODBC Data Source doesn't seem to work either, so you should select Windows Authentication, or use RC010 which has fixed this problem.

Note that to get Windows Authenticaiton to work, you will have to:

  1. Set your SQL Server to use Mixed-Mode: in SQL Server Management Studio, right-click on your server and go to Properties; go to the Security tab; set Server authentication to SQL Server and Windows Authentication mode.
  2. Give your Windows login sysadmin rights: in SQL Server Management Studio, expand your Server, then under Security, right-click on Logins and select New Login. Enter your Login name. Go to Server Roles and tick sysadmin.


Enter a SQL Server Login name and password. You should create a login name such as "syspro"; it's bad practice to use the "sa" login. Tick "All SYSPRO operators will use this SQL Server login".


Enter your connection string for SQL Server.


Note that there is temporarily, in the release candidate, a problem with using connection strings - there is an error in COMLGN were  Callbo does not work (and SRS), so you should use a System Data Source Name (DSN).

If you are connecting via a DSN, then you will need to manually create an ODBC data source first, unless you selected to install the SQL ODBC Data Source as part of the installation earlier.

Enter the name of the Syspro system-wide database; you'd normally leave this unchanged as Sysprodb:


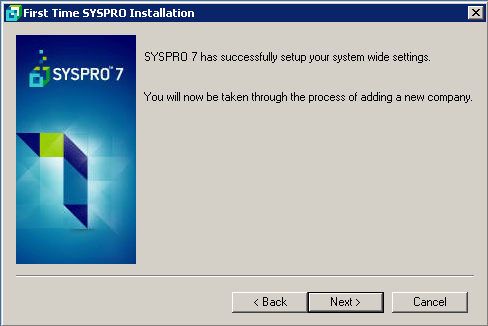
The ensuing steps are fairly straight forward and so are not listed in detail here.
__________________________________________________________________________

If you hit an error such as:

Message: Incorrect open mode for fle type
Access: Attempting to open a file
File name: C:\SYSPRO7\WORK\IMPACT.INI
Status: 37
Program: IMPNEW - Admin First Time SYSPRO Installation


then you may need to give additional permission on the Syspro WORK directory, as shown in the screen shot below:


__________________________________________________________________________


Thursday, 10 October 2013

How to fix the dreaded Grey Screen of Death in Syspro

If you add a custom-written .Net User Control to a custom pane in Syspro, you can easily get the dreaded Grey Screen of Death - a blank grey screen (see screen shot below).


One of the most common reasons for this happening is that Syspro can't find one of the DLL's needed by your .Net solution. So where does Syspro look for the DLL's?


  1. The first DLL loaded must be in Syspro's BASE\ManagedAssemblies folder. This is the one you configure when you create the custom pane (see screen shot below).
  2. Then Syspro will look in its BASE directory, for all subsequent DLL's referenced by the first and subsequent DLL's; for those subsequent DLL's, Syspro WILL NOT look in the ManagedAssemblies directory. This is because Syspro doesn't have control over where subsequent DLL's are loaded from, so Windows tries to load them from the same folder that the Syspro client (IMPACT.EXE, IMPCSC.EXE, or SYSPRO.EXE) is run from. That directory is usually Syspro's BASE directory, NOT the ManagedAssemblies folder.
  3. Windows will then look in the GAC.

This is problematic because Syspro only distributes DLL's in the ManagedAssemblies folder automatically from the server to all the Syspro clients; custom DLL's in the BASE directory will not be distributed by Syspro.

There are a number of ways to solve this:

  1. Place your dependent DLL's in the BASE folder. This is the least-preferred option because you have to do it manually on each client PC.
  2. Place your dependent DLL's in the GAC. Also not a preferred option.
  3. Merge all your DLL's using ILMERGE, then place the merged DLL in the ManagedAssemblies folder.
    This works fine for WinForm-based applications, but won't work for WPF-based forms as ILMERGE can't merge all the WPF files.
  4. Add some code to your first DLL, then place your dependent DLL's in the ManagedAssemblies folder.
    This is the recommended solution.
    See this post for details: http://support.syspro.com/forums/viewtopic.php?f=1&t=4603#p20524


How to find what DLL's are not being loaded

Now we get to the point of this post: HOW to find what DLL's have not been loaded.
The key is to run ProcMon: run a trace while you invoke the custom pane for the first time after starting Syspro.
Then use a reasonable filter such as shown in the screen shot below:


Then search the list and you may find what DLL has been missed, as shown in the screen shot below.


This method doesn't always seem to work, for reasons I don't yet know, but its the best method I know of to find the exact problem directly.